React Class - 1
https://www.youtube.com/playlist?list=PLC3y8-rFHvwgg3vaYJgHGnModB54rxOk3
Install cmd
D:\Practice Projects\@react\curd_tutorial\react-demo
https://towardsdatascience.com/build-a-simple-todo-app-using-react-a492adc9c8a4
--------------
install node
node -v
npm install -g create-react-app
create-react-app --version
npm view react version
create-react-app reactfirst YOUR_APP_NAME
cd reactfirst
npm start
ctrl + c = Terminate
------------------------
npm init
npm install react --save-dev
npm install react-dom --save-dev
npm install react-scripts --save-dev
https://www.guru99.com/reactjs-tutorial.html
ReactJS is an open-source front-end JavaScript library for building user interfaces. ReactJS is maintained by Facebook and a community of individual developers and companies. It is widely used as a base in building single-page websites and mobile applications. It is very easy to use, and it allows users to create reusable UI components
Features of ReactJS
JSX : JSX is an extension to javascript. Though it is not mandatory to use JSX in react, it is one of the good features and easy to use.
Components: Components are like pure javascript functions that help make the code easy by splitting the logic into reusable independent code. We can use components as functions and components as classes. Components also have a state, props which makes life easy. Inside a class, the state of each of the props is maintained.
Virtual DOM: React creates a virtual dom, i.e., in-memory data -structure cache. Only the final changes of DOM has later updated in the browsers DOM.
Javascript Expressions: JS expressions can be used in the jsx files using curly brackets, for example {}.
Advantages of ReactJS
- ReactJS uses virtual dom that makes use of in-memory data-structure cache, and only the final changes are updated in browsers dom. This makes the app faster.
- You can create components of your choice by using the react component feature. The components can be reused and also helpful in code maintenance.
- Reactjs is an open-source javascript library, so it is easy to start with.
- ReactJS has become very popular in a short span and maintained by Facebook and Instagram. It is used by many famous companies like Apple, Netflix, etc.
- Facebook maintains ReactJS, the library, so it is well maintained and kept updated.
- ReactJS can be used to develop rich UI for both desktop and mobile apps.
- Easy to debug and test as most of the coding is done in Javascript rather than on Html.
Disadvantages of ReactJS
Here, are cons/ drawbacks of using ReactJS:
- Most of the code is written in JSX, i.e., Html and css are part of javascript, it can be quite confusing as most other frameworks prefer keeping Html separate from the javascript code.
- The file size of ReactJS is large.
Once you have nodejs installed, create a folder reactproj/.
To start with project setup, run command npm init.
This is how the folder structure will look like:
reactproj\
package.json
Now we will install the packages that we need.
Here are the list of packages for reactjs:
npm install react --save-dev
npm install react-dom --save-dev
npm install react-scripts --save-dev
Open the command prompt and run above commands inside the folder reactproj/.
Create a folder src/ where all the js code will come in that folder. All the code for reactjs project will be available in the src/ folder. Create a file index.js and add import react and react-dom, as shown below.
index.js
import React from 'react';
import ReactDOM from 'react-dom';

ReactDOM.render(
<h1>Hello, Tutorials!</h1>,
    document.getElementById('root')
);
We have returned the basic code for reactjs. We will explain the details of it in the next chapter. We want to display Hello, react Tutorials and the same is given to the dom element with id “root”.It is taken from the index.html file, which is the start file, as shown below.
Create a folder public/ and add index.html in that as shown below
index.html
<!DOCTYPE html>
<html>
  <head>
    <meta charset="UTF-8" />
    <title>ReactJS Demo</title>
  </head>
  <body>
    <div id = "root"></div>
   </body>
</html>
The package react-scripts will take care of compiling the code and starting the server to display the html file i.e index.html. You need to add the command in package.json that will take care of using react-scripts to compile the code and start server as shown below:
 "scripts": {
    "start": "react-scripts start"
  }
After installing all the packages and adding the above command, the final package.json is as follows:
Package.json
{
  "name": "reactproj",
  "version": "1.0.0",
  "description": "",
  "main": "index.js",
  "scripts": {
    "start": "react-scripts start"
  },
  "author": "",
  "license": "ISC",
  "devDependencies": {
    "react": "^16.9.0",
    "react-dom": "^16.9.0",
    "react-scripts": "^3.1.1"
  }
}
To start testing reactjs run the command
npm run start
C:\reactproj>npm run start
> reactproj@1.0.0 start C:\reactproj
> react-scripts start
It will open browser with url http://localhost:3000/ as shown below:
public/index.html
<!DOCTYPE html>
<html>
  <head>
    <meta charset="UTF-8" />
    <title>ReactJS Demo</title>
  </head>
  <body>
    <div id = "root"></div>
  </body>
</html>

We are going to use the same process to execute the javascript files in the next chapters too. Add all your js and .jsx file in src/ folder .The file structure will be as follows:
reatproj/
	 src/
	    index.js
	 node_modules/
	 public/
                index.html
	 package.json
How to Create Your First React Project Setup
Here is a step by step guide in this ReactJS Tutorial to start with the first react application.
Step 1) Import the react packages.
1. To start with ReactJS, we need to first import the react packages as follows.
import React from 'react';
import ReactDOM from 'react-dom';
2. Save the file as index.js in src/ folder
Step 2) Write Simple Code.
We will write a simple code in this tutorial React JS, wherein we will display the message “Hello, react Tutorials!”
ReactDOM.render(

<h1>Hello, from react Tutorials!</h1>,
    document.getElementById('root')
);
ReactDOM.render will add the <h1> tag to the element with id root. Here is the html file we are having:
<!DOCTYPE html>
<html>
  <head>
    <meta charset="UTF-8" />
    <title>ReactJS Demo</title>
  </head>
  <body>
    <div id = "root"></div>
  </body>
</html>
Step 3) Compile the Code.
Next in this React.js Tutorial, we need to compile the code to get the output in the browser.
Here is the folder structure:
reactproj/
     node_modules/
     src/
       index.js
     package.json
     public/
          index.html
We have added the commands to compile the final file in package.json as follows:
"scripts": {
    "start": "react-scripts start"
  },
To compile the final file run following command:
npm run start
When you run above command, it will compile the files and notify you if any error, if all looks good, it will open the browser and the run the index.html file at http://localhost:3000/index.html
Command: npm run start:
C:\reactproj>npm run start

> reactproj@1.0.0 start C:\reactproj
> react-scripts start
Step 4) Check Output.
The URL http://localhost:3000 will open in the browser once the code is compiled as shown below:

What is JSX?
JSX is an extension to javascript. It is a template script where you will have the power of using HTML and Javascript together.
Here is a simple example of a JSX code.
const h1tag = "<h1>Hello, from react Tutorials!</h1>";
Why we need JSX in React?
For a UI, we need Html, and each element in the dom will have events to be handled, state changes, etc.
In case of React, it allows us to make use of Html and javascript in the same file and take care of the state changes in the dom in an efficient manner.
Expressions in JSX
Here is a simple example of how to use expressions in JSX.
In earlier ReactJS examples, we had written something like :
index.js
import React from 'react';
import ReactDOM from 'react-dom';

ReactDOM.render(
<h1>Hello, react  Tutorials!</h1>,
    document.getElementById('root')
);
We will now change the above code to add expressions. Expressions are used inside curly brackets {}, and they are expanded during run time. Expressions in react are the same as javascript expressions.
index.js
import React from 'react';
import ReactDOM from 'react-dom';

const display = "Hello, react  Tutorials!";
const h1tag = "<h1>{display}</h1>";
ReactDOM.render(
    h1tag,
    document.getElementById('root')
);
Let us now test the same in the browser.
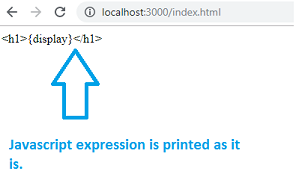
You can see that the {display} expression is not replaced. React does not know what to do when an expression is used inside the .js file.
Let us now add changes and create a .jsx file, as shown below:
test.jsx
import React from 'react';
import ReactDOM from 'react-dom';

const display = "Hello, to react Tutorials";
const h1tag =<h1>{display}</h1>;
export default h1tag;
We have added the required code and will use the text.jsx file in index.js.We want the h1tag variable to be used inside script.js, so the same is exported as shown above in the test.jsx
Here is the modified code in index.js
import React from 'react';
import ReactDOM from 'react-dom';
import h1tag from './test.jsx';

ReactDOM.render(
    h1tag,
    document.getElementById('root')
);
import h1tag from './test.jsx';
We can use the h1tag now in the ReactDOM.render as shown below:
ReactDOM.render(
    h1tag,
    document.getElementById('root')
);
Here is the output when we check the same in the browser:

-----------------------
What are Components in ReactJS?
Components are like pure javascript functions that help make the code easy by splitting the logic into reusable independent code.
Components as functions
test.jsx
import React from 'react';
import ReactDOM from 'react-dom';
function Hello() {
    return <h1>Hello, react  Tutorials!</h1>;
}
const Hello_comp = <Hello />;
export default Hello_comp;
We have created a function called Hello that returned h1 tag as shown above. The name of the function acts as an element, as shown below:const Hello_comp = <Hello />; export default Hello_comp;The Component Hello is used as an Html tag, i.e., <Hello /> and assigned to Hello_comp variable and the same is exported using export.
Let us now use this component in index.js file as shown below:
index.js
import React from 'react'; import ReactDOM from 'react-dom'; import Hello_comp from './test.jsx'; ReactDOM.render( Hello_comp, document.getElementById('root') );Here is the output in the browser:
Class as Component
Here is a ReactJS example that uses a class as a component.
test.jsx
import React from 'react'; import ReactDOM from 'react-dom'; class Hello extends React. Component { render() { return <h1>Hello, react Tutorials!</h1>;
} } export default Hello;We can use Hello component in index.js file as follows:
index.js
import React from 'react'; import ReactDOM from 'react-dom'; import Hello from './test.jsx'; ReactDOM.render( <Hello />, document.getElementById('root') );The Component Hello is used as an Html tag i.e., <Hello />.
Here is the output of the same.
-------------Props to Class Component
To access the props in a class we can do it as follows:
test.jsx
import React from 'react'; import ReactDOM from 'react-dom'; class Hello extends React.Component { render() { return <h1>{this.props.msg}</h1>; } } export default Hello;The msg attribute is passed to the component in index.js as follows:
import React from 'react'; import ReactDOM from 'react-dom'; import Hello from './test.jsx'; ReactDOM.render( <Hello msg="Hello, react!" />, document.getElementById('root') );This is the output in the browser:


------------------------------------
Life Cycle of a Component
A component life cycle is divided into Initialization, Mounting, Update, and UnMounting stages.
Here is a detail explanation about each Component.
A component in reactjs has the following stages :
Initialization: This is the first stage of the component life cycle.
Here it will have the default props and the state at the initial level.
Mounting: In this phase, the Component is rendered inside the dom. We having exposure to following methods in the mounting state.
- componentDidMount(): This is also called when the Component is just added to the dom.
- render(): You have this method for all the components created. It returns the Html node.
Update: In this state, the dom is interacted by a user and updated. For example, you enter something in the textbox, so the state properties are updated.
Following are the methods available in update state:
- shouldComponentUpdate() : called when the component is updated.
- componentDidUpdate() : after the component is updated.
UnMounting: this state comes into the picture when the Component is not required or removed.
Following are the methods available in unmount state:
Component willUnmount(): called when the Component is removed or destroyed.
------------------------------------------------------
Working Example
Here is a working example which shows the methods called at each state.
Example: complife.jsx
import React from 'react';
import ReactDOM from 'react-dom';
class COMP_LIFE extends React.Component {
  constructor(props) {
    super(props);
    this.state = {name: ''};

    this.UpdateName = this.UpdateName.bind(this);
    this.testclick = this.testclick.bind(this);
  }

  UpdateName(event) {
    this.setState({name: event.target.value});
  }

  testclick(event) {
    alert("The name entered is: "+ this.state.name);
  }

  componentDidMount() {
    console.log('Mounting State : calling method componentDidMount');
  }

  shouldComponentUpdate() {
    console.log('Update  State : calling method shouldComponentUpdate');
    return true;
  }

  componentDidUpdate() {
    console.log('Update  State : calling method componentDidUpdate')
  }
  componentWillUnmount() {
    console.log('UnMounting State : calling method componentWillUnmount');
  }

  render() {
    return (
      <div>
         Enter Your Name:<input type="text" value={this.state.name} onChange={this.UpdateName} /><br/>
        <h2>{this.state.name}</h2>
        <input type="button" value="Click Here" onClick={this.testclick} />
      </div>
    );
  }
}

export default COMP_LIFE;
index.js
import React from 'react';
import ReactDOM from 'react-dom';
import COMP_LIFE from './complife.jsx';

ReactDOM.render(
    <COMP_LIFE />,
    document.getElementById('root')
);
When you check the output in the browser

In browser console you get :
![]()
When the user enters in the textbox:

In console following messages are displayed:

Working with Forms
In reactjs Html input elements like <input />, <textarea /> and <select /> has their own state and needs to be updated when user interacts using the setState() method.
In this chapter, we will see how to work with forms in reactjs.
Here is a working example:
form.jsx
import React from 'react';
import ReactDOM from 'react-dom';
class Form extends React.Component {
  constructor(props) {
    super(props);
    this.state = {name: ''};

    this.UpdateName = this.UpdateName.bind(this);
    this.formSubmit = this.formSubmit.bind(this);
  }

  UpdateName(event) {
    this.setState({name: event.target.value});
  }

  formSubmit(event) {
    alert("The name entered is: "+ this.state.name);
  }

  render() {
    return (
      <form>
         Enter Your Name:<input type="text" value={this.state.name} onChange={this.UpdateName} /><br/>
        <h2>{this.state.name}</h2>
        <input type="submit" value="Submit" onClick={this.formSubmit} />
      </form>
    );
  }
}

export default Form;
For the input fields, we need to maintain the state, so for that react provides a special method called setState, which helps to maintain the state whenever there is a change.
We have used events onChange and onClick on the textbox and submit button. When the user enters inside the textbox the onChange event is called, and the name field inside state object state is updated as shown below:
UpdateName(event) {
    this.setState({name: event.target.value});
  }
index.js
import React from 'react';
import ReactDOM from 'react-dom';
import Form from './form.jsx';

ReactDOM.render(
    <Form />,
    document.getElementById('root')
);
The output in the browser is as follows:

Step 1) Enter your name in the textbox:

- Click on submit button

Working with Events in ReactJS
Working with events in reactjs is same as how you would have done in javascript. You can use all the event handlers that are used in javascript. The setState() method is used to update the state when the user interacts with any Html element.
Here is a working example of how to use events in reactjs.
events.jsx
import React from 'react';
import ReactDOM from 'react-dom';
class EventTest extends React.Component {
  constructor(props) {
    super(props);
    this.state = {name: ''};

    this.UpdateName = this.UpdateName.bind(this);
    this.testclick = this.testclick.bind(this);
  }

  UpdateName(event) {
    this.setState({name: event.target.value});
  }

  testclick(event) {
    alert("The name entered is: "+ this.state.name);
  }

  render() {
    return (
      <div>
         Enter Your Name:<input type="text" value={this.state.name} onChange={this.UpdateName} /><br/>
        <h2>{this.state.name}</h2>
        <input type="button" value="Click Here" onClick={this.testclick} />
      </div>
    );
  }
}

export default EventTest;
For the input fields, we need to maintain the state, so for that react provides a special method called setState, which helps to maintain the state whenever there is a change.
We have used events onChange and onClick on the textbox and button. When the user enters inside the textbox the onChange event is called, and the name field inside state object state is updated as shown below:
UpdateName(event) {
    this.setState({name: event.target.value});
  }
index.js
import React from 'react';
import ReactDOM from 'react-dom';
import EventTest from './events.jsx';

ReactDOM.render(
    <EventTest />,
    document.getElementById('root')
);
Here is the output in the browser:

When a user enters the name :

When the user clicks on the Click Here button:

------------------------------------------------------
Folder Structure
Node module - all dependencies will installed here
Public - manifest.json - contains details about project in high level
index.html - home screen - <div id="root"></div>
The app component is loading inside the root
index.js - main js file
public
- It contains static files such as index.html, javascript library files, images, and other asset.
src
- It contains the source code of the project.
src/assets
- It contain the assets like images, css & fonts
Introduction To React & JSX
ReactJS is one of the most popular JavaScript front-end libraries which has a strong foundation and a large community.
Why we use ReactJS?
The main objective of ReactJS is to develop User Interfaces (UI) that improves the speed of the apps. It uses virtual DOM (JavaScript object), which improves the performance of the app. The JavaScript virtual DOM is faster than the regular DOM. We can use ReactJS on the client and server-side as well as with other frameworks. It uses component and data patterns that improve readability and helps to maintain larger apps.
Latest version - Apr-2022 - 18.0.0
Pre-requisite for ReactJS
- NodeJS and NPM
- React and React DOM
- Webpack
- Babel
Ways to install ReactJS
There are two ways to set up an environment for successful ReactJS application. They are given below.
- Using the npm command
- Using the create-react-app command
1. Using the npm command
Install NodeJS and NPM
NodeJS and NPM are the platforms need to develop any ReactJS application. You can install NodeJS and NPM package manager by the link given below.


Comments
Post a Comment