Customizing Asp.Net Core Identity
https://learn.microsoft.com/en-us/aspnet/core/security/authentication/identity?view=aspnetcore-7.0&tabs=visual-studio
https://github.com/aspnet/Identity/blob/rel/2.0.0/src/Microsoft.Extensions.Identity.Core/UserValidator.cs


-----------------------------------------------
Adding ASP .NET Core Identity to Web API Project

Add NuGet Packages
- Install
Nuget Galleryfrom extension marketplace. - Launch from the menu bar
View > Command Paletteor ⇧⌘P (Ctrl+Shift+P on Windows and Linux). TypeNuget: Open Gallery. - The GUI above is displayed. You can filter just like in regular Visual Studio.
- Make sure the
.csproj filecheckbox is selected, select version from dropdown, and click install button.
Please make sure you add below NuGet packages to the Web API Project:
- Microsoft.AspNetCore.Identity.EntityFrameworkCore
- Microsoft.EntityFrameworkCore
- Microsoft.EntityFrameworkCore.Design (this is important for runnig EF Core migrations commands)
- Microsoft.EntityFrameworkCore.SqlServer
- Microsoft.EntityFrameworkCore.Tools (if you want to install EF Core tools for NuGet Package Manager).

IdentityDbContext
This is the DbContext which comes out of the box with Microsoft.AspNetCore.Identity.EntityFrameworkCore NuGet package. The important classes are:
- IdentityDbContext, represents the DbContext for Identity. It has definitions for all the tables required to enable ASP .NET Core Identity.
- IdentityUser, which represents a user in Identity database
- IdentityRole, which represents a role in Identity database
create a class ApplicationDbContext, which derives from IdentityDbContext. The ApplicationDbContext can contain your application tables as well. For the purpose of this demo, let’s just derive this class from IdentityDbContext and create a constructors which accepts DbContextOptions parameter as shown in below code.
Configure Identity
open the Startup configurations and add below code under ConfigureServices. This code will setup the database context. The second line configures the database which should be used for identity.
AddIdentity(IServiceCollection) adds the default identity system configuration for the specified User and Role types.
services.AddDbContext<ApplicationDbContext>(options => options.UseSqlServer(Configuration.GetConnectionString("SqlConnection")));

services.AddIdentity<IdentityUser, IdentityRole>(options => options.SignIn.RequireConfirmedAccount = true)
                .AddEntityFrameworkStores<ApplicationDbContext>();
Migrations and Create Database
Below commands are the commands which can be used to create the database.
First command is to install the EF Core migration tools.
dotnet tool install --global dotnet-ef --version 3.1.0
The Second command can be used to create a migration.
dotnet-ef migrations add First
The third one to create the database in SQL Server. The database will be created in the SQL server instance which is specified in the connection string inside appsettings.json.
dotnet-ef database update


-----------------------------------------------
ASP.NET Core Identity •
An API that supports user interface (UI) login functionality out of the box.
• You can manage users, passwords, roles, email confirmation, 2FA, and more.
• Users can create an account with the login information stored in Identity or they can use an external login provider.
• Supported external login providers include Facebook, Google, Microsoft Account, and Twitter
Identity options
options.User.AllowedUserNameCharacters
options.User.RequireUniqueEmail
options.Password.RequireDigit
Properties


Sign-in
The following code sets SignIn settings (to default values):
builder.Services.Configure<IdentityOptions>(options =>
{
    // Default SignIn settings.
    options.SignIn.RequireConfirmedEmail = false;
    options.SignIn.RequireConfirmedPhoneNumber = false;
});
| Require | Gets or sets a flag indicating if passwords must contain a digit. Defaults to true. |
| Required | Gets or sets the minimum length a password must be. Defaults to 6. |
| Required | Gets or sets the minimum number of unique characters which a password must contain. Defaults to 1. |
| Require | Gets or sets a flag indicating if passwords must contain a lower case ASCII character. Defaults to true. |
| Require | Gets or sets a flag indicating if passwords must contain a non-alphanumeric character. Defaults to true. |
| Require | Gets or sets a flag indicating if passwords must contain a upper case ASCII character. Defaults to true. |
2 Factor Authentication
• All modern systems offer what we call “2 Factor Authentication”
• This means in addition to enter the password, the user needs to enter a one-time password received on E-Mail or SMS.
• An alternative is to use an Authenticator App like “Google Authenticator” or “Microsoft Authenticator” available on iPhone and Android.


-----------------------------------To Allow Multiple Username
By default identity will allow us to set same email for different user .
But it will not allow us to set duplicate username for different user.
In our project we had a requirement like to set duplicate username
Because for different districts we've different website domains.
Previously we've maintained with different database for different districts
But in the new migration process , Our clients want to store all district user in same district.
So we did R & D on that. But We didn't found any proven solution / articles relevant to that
Finally we did some analyses on inbuild .Net core classes that relevant to .Net Core Identity
By overriding inbuild .Net core methods we can achieve the duplicate user name.
- add duplicate user name ( delete db & add override method in .Net )
- add combined unique user name
Two placed we've to modify

we've to delete this index manually .. or in the First Migration we can remove the line
before executing update-database command
migrationBuilder.CreateIndex(
name: "UserNameIndex",
table: "AspNetUsers",
column: "NormalizedUserName",
unique: true,
filter: "[NormalizedUserName] IS NOT NULL");


First let me explain the problem
The reason is why the Identity library injects the validate user class that uses the default library, which is UserValidator.
The solution is only to inject a CustomUserValidator. What happens is that if it is injected into the normal implementation, what it does is that it adds 2 UserValidator, the first is the default by the identity library and the second would be the one that you implemented the CustomUserIdentity.
Then to inject only the CustomUserIdentity you must create a new CustomUserManager to be able to inject the new ICustomUserValidator so that it does not take the one that is by default IUserValidator.
This is my solution:
This is the interface ICustomUserValidator
    public interface ICustomUserValidator<TUser> : IUserValidator<TUser> where TUser : ApplicationUser
{
}
And the implementation of the class
public class CustomUserValidator<TUser> : UserValidator<TUser>, ICustomUserValidator<TUser>
    where TUser : ApplicationUser
{

    public async Task<IdentityResult> ValidateAsync(UserManager<TUser> manager, TUser user)
    {
        //Some Code
    }

    private async Task ValidateUserName(UserManager<TUser> manager, TUser user, ICollection<IdentityError> errors)
    {
        //Some Code
    }
}
And this one for the CustomUserManager
    public class CustomUserManager<TUser> : UserManager<TUser>
            where TUser : ApplicationUser
{
    public CustomUserManager(IUserStore<TUser> store, IOptions<IdentityOptions> optionsAccessor,
        IPasswordHasher<TUser> passwordHasher, IEnumerable<ICustomUserValidator<TUser>> userValidators,
        IEnumerable<IPasswordValidator<TUser>> passwordValidators, ILookupNormalizer keyNormalizer,
        IdentityErrorDescriber errors, IServiceProvider tokenProviders,
        ILogger<UserManager<TUser>> logger)
        : base(
            store, optionsAccessor, passwordHasher, userValidators, passwordValidators, keyNormalizer, errors,
            tokenProviders, logger)
    {
    }
}
Notice that instead of IUserValidator, I put ICustomUserValidator
In the Startup class you have to inject the new class:
        services.AddIdentity<ApplicationUser, IdentityRole>()
            .AddEntityFrameworkStores<ApplicationDbContext>()
            .AddUserManager<CustomUserManager<ApplicationUser>>()
And finally inject this class
services.AddTransient<ICustomUserValidator<ApplicationUser>, CustomUserValidator-----------------------------------
Customize Table Name & column nameswe can do this easily by modifying the IdentityModel.cs as per the below:
Override OnModelCreating in your DbContext then add the following, this will change AspNetUser table to "user"

we 
--------------------------------------------
Add new table to identity
Here I've added a example  class called "UserSchool" to add new table in database

Create another class User and inherit pre-defined IdentityUser Table and we need to add as
a property for our new class which we want to create as new table

In  DbContext Class  Open it and register User and Article classes.


  Then in the same class add the model builder like below


----------------------------
Add new column to existing table
Create ApplicationUser class . This class is a model which represents users of your application.
Then we need to add the properties that we want to add in existing table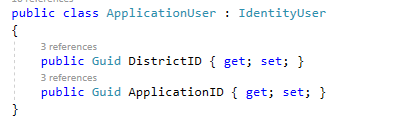
Then We've to modify the ApplicationDbContext
We need to add <ApplicationUser> with IdentityDbContext

Then we need to add thisin theOnModelCreating method

And Apply the migration and update - database
----------------------------

Comments
Post a Comment