Notes - ASP.NET CORE SYLLABUS V2
ASP.NET CORE SYLLABUS V2
https://dotnettutorials.net/course/asp-net-core-web-api-tutorials/
.NET Core Training Syllbus: Introduction to .NET Core
Overview of .NET Core
ASP.NET Core is a cross-platform, high-performance, open-source framework for building modern, cloud-enabled, Internet-connected apps. With ASP.NET Core, you can: Build web apps and services, Internet of Things (IoT) apps, and mobile backends. Use your favorite development tools on Windows, macOS, and Linux
Framework Architecture and Advantages .NET
advantages of choosing to develop your application with .NET Core:
Advantages of ASP.NET Core

- Fast - It is a lightweight, high-performance web framework.
- Integration of Modern UI Framework - ASP.NET Core support modern, a Client-side framework like AngularJs, ReactJs and React with Redux etc. ASP.NET framework supports client-side framework templates like AngularJs, ReactJs and React with Redux etc.
- Hosting - It has the ability to host on IIS, Apache, Docker or Self Hosting.
- Cross Platform - ASP.NET Core web application can run on Windows, Mac, Linux development tools.
- Support Built-In Dependency Injection - It supports built-in Dependency Injection.
- Supports Modular - It support modular HTTP request.
- Open-Source - It is an open-source and community-focused web framework.
- Side-by-side app versioning - ASP.NET Core runs on .NET Core which supports the simultaneous running of multiple versions of applications.
- A unified story for building web UI and web APIs.
Key Terminologies in the Architecture of .NET Core
The key terminology in architecture of .net core is as follows:
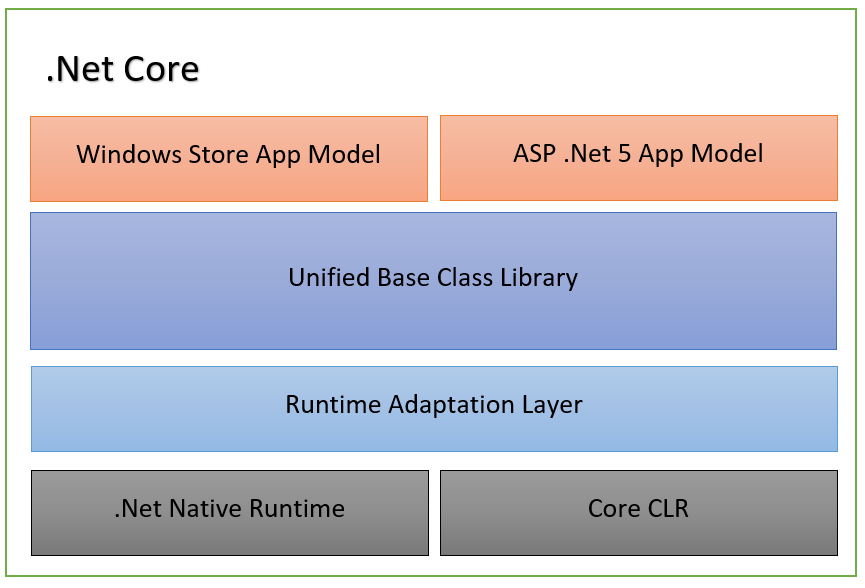
- Core CLR: Core CLR is the Common Language Runtime optimized for multiplatform and cloud-based deployments. This, along with .Net Native Runtime, forms the foundation of all .Net based platforms.
- .Net Native Runtime: Also referred to as Managed Runtime, .Net Native Runtime contains the native windows based libraries. This also contains Ahead Of Time (AOT) compilation instead of the erstwhile Just In Time (JIT) compilation. This improves the performance of the applications. The .Net Native Runtime and the Core CLR are the layers that contain implementations of primitive types as well as generic collections in .Net. These layers hardly change and are constant throughout the various .Net stacks. The various .Net stack APIs, thus, share the same implementations.
- Unified BCL: The Unified Base Class Library, also referred to as CoreFX, consists of the basic and fundamental classed that form the core of the .Net Core platform.
- App Models: On top of the BCL, sit the various App Models that developers leverage to develop platform-specific applications. Currently, .Net Core has the ASP .Net Model for web development and Windows Store Model for windows application development.
.NET CLI
Working in DNX, DNVM, DNU

DNVM - The .NET Version Manager
DNVM is a version manager tool for the command line. As its name implies, DNVM provides the functionality needed to configure your .NET runtime. We can use DNVM to specify which version of the .NET Execution Environment to use at the process, user, or machine level.
DNX - The .NET Execution Environment
What is this DNX, anyway? From the ASP.NET Documentation site:
The .NET Execution Environment (DNX) is a software development kit (SDK) and runtime environment that has everything you need to build and run .NET applications for Windows, Mac and Linux. It provides a host process, CLR hosting logic and managed entry point discovery. DNX was built for running cross-platform ASP.NET Web applications, but it can run other types of .NET applications, too, such as cross-platform console apps.
Broadly speaking, different DNX runtime versions are available which reflect which .NET framework version you want to use in your application. At a basic level, there are different versions for:
- .NET Framework - The familiar .NET framework we all know and love.
- .NET Core - A subset of the .NET Framework which includes a modular runtime and library implementation and is managed via Nuget. .NET Core is cross-platform, open source, and includes the Core libraries in CoreFX, and a Core runtime in CoreCLR.
- Mono - Using Mono, we can create ASP.NET application which compile and run on OSX and Linux machines.
DNU - .NET Development Utilities
DNU is a command-line tool which provides a variety of utility functions to assist with development in ASP.NET. Most commonly, we will use DNU to install and manage library packages in our application, and/or to package and publish our own application.
DNU uses Nuget behind the scenes for package management and deployment.
Introduction to .NET CLI and CLI Commands
https://www.tutorialsteacher.com/core/net-core-command-line-interface
Introduction to ASP.NET Core
Understanding ASP.NET Core
ASP.NET Core Features
Detailed Understanding in ASP.NET Core 1.0, ASP.NET MVC5 and ASP.NET
| Basis | .NET Core | .NET Framework |
| Platform or Framework | When we talk about .NET Core it is defined as the platform on which frameworks like ASP.NET Core and the Universal Windows Platform rely and extend the .NET Core platform’s functionalities. | .Net Framework is a full-fledged development framework. The framework provides all the basic requirements for the development of applications such as UI, DB connectivity, services, APIs, etc. |
| Open-Source | .NET Core is an open-source platform. | The.Net Framework includes certain open source components. |
| Cross-Platform | It is based on the concept of “create once, run anywhere.” Because it is cross-platform, it is compatible with a variety of operating systems, including Windows, Linux, and Mac OS. | .NET Framework is compatible with Windows OS(operating system) only |
| Application models | The Application Model of .Net Core includes ASP.NET and windows universal apps. | The Application Model of the .NET Framework includes WinForms, ASP.NET, and WPF. |
| Installation | .Net Core is the cross-platform, hence it needs to be installed independently. | .NET Framework has a single packaged installation and runtime environment for windows. |
| Microservices support | .NET Core has support for microservices. , NET Core allows a mix of technologies that can be minimalized for each microservice. | When we talk about the .NET Framework it does not allow for the construction and deployment of microservices in multiple languages. |
| REST services support | .NET Core has no support for WCF( Windows Communication Foundation ) services. You would always need to create a REST API. | When it comes to WCF (Windows Communication Foundation) services, the.NET Framework is a fantastic choice. It also works with RESTful services. |
| Performance and Scalability | .NET core provides high scalability and performance in comparison to .NET Framework because of its architecture. | .NET Framework is less scalable and provides low performance in comparison to .NET Core. |
| Security | Feature such as Code Access Security is not present in .NET core so .NET Framework does have the edge in that case. | .NET Framework has this feature called code access security. |
| Focus on devices | .NET Core focuses to develop apps in a variety of domains like gaming, mobile, IoT, AI, etc. | .NET Framework is limited to window OS. |
| Compatibility | Mobile.NET Core is compatible with various operating systems-Windows, Linux, and Mac OS. | On the other .NET Framework is only compatible with Windows OS. |
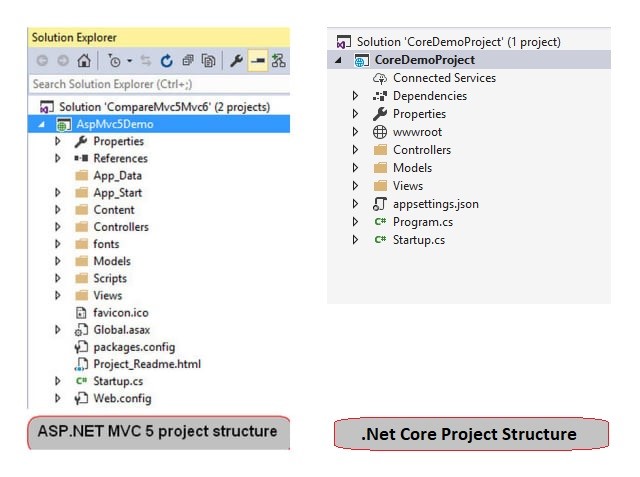
PROJECT STRUCTURE CHANGE
In Asp.Net Core application, project or solutions folder structures have been changes. The major difference in the project structure is that Asp.Net Core projects do not contain any web.config file like Asp.Net MVC projects. So, then question arise that however, the applying deals with completely different configuration settings like authentication or application low-level formatting specific code etc. In Asp.net Core, these will be taking care by some other files namely appsettings.json or custom configuration files. Also, in Asp.Net Core, a new folder named wwwroot added in the project structure. This files basically is the container of all static files which need to be sent to the browser like – css, html, images, JavaScripts etc. The below image has shown a clear difference in both the project structure.
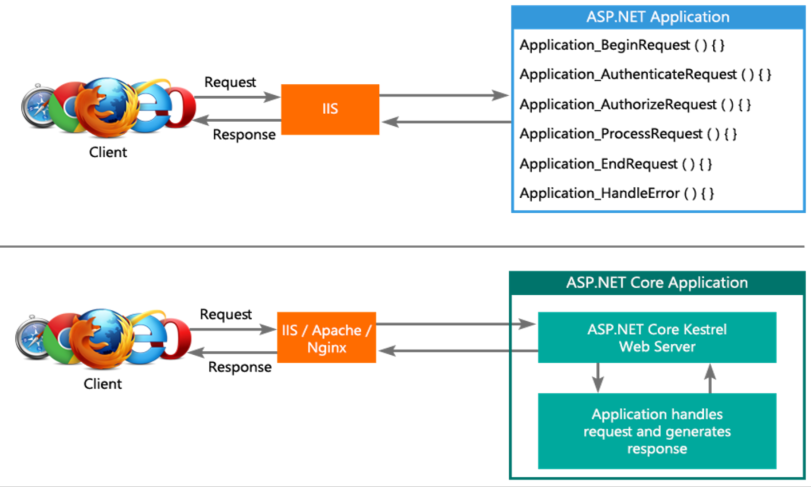
DOES NOT DEPENDS ON IIS FOR HOSTING
As we have already discussed that Asp.Net Core is a Cross-Platform framework, so we can host Asp.Net Core applications not only in IIS but also it can be hosted in the Nginx, Apache, Docker etc. So, we can host the asp.net core application in the Linux webserver using Nginx. In this case, Kestrel will act as an internal web server for processing request.
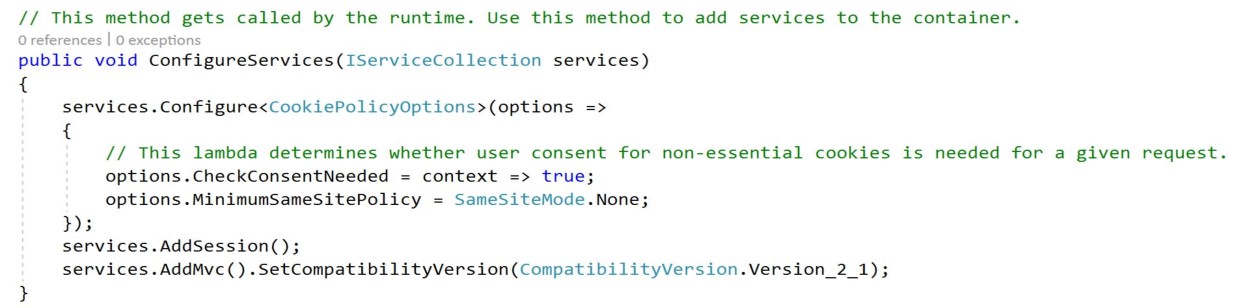
IN BUILD DEPENDENCY INJECTION (DI)
Dependency Injection (DI) achieves loosely coupled, additional testable code in the applications. In ASP.NET MVC 5/4 or classic ASPX based mostly applications, we tend to use to own separate DI containers used like Unity, AutoFac, StructureMap etc. We had to form up our project to use DI, its additional effort.
Model, View and Controller
Model
The Model component corresponds to all the data-related logic that the user works with. This can represent either the data that is being transferred between the View and Controller components or any other business logic-related data. For example, a Customer object will retrieve the customer information from the database, manipulate it and update it data back to the database or use it to render data.
View
The View component is used for all the UI logic of the application. For example, the Customer view will include all the UI components such as text boxes, dropdowns, etc. that the final user interacts with.
Controller
Controllers act as an interface between Model and View components to process all the business logic and incoming requests, manipulate data using the Model component and interact with the Views to render the final output. For example, the Customer controller will handle all the interactions and inputs from the Customer View and update the database using the Customer Model. The same controller will be used to view the Customer data
Types of Views
- Index.cshtml
- layout
- view start
- viewimport
Razor View Engine

Understanding Razor View Engine
Razor View engine is a markup syntax which helps us to write HTML and server-side code in web pages using C# or VB.NET. It is server-side markup language however it is not at all a programming language.
Razor is a templating engine and ASP.NET MVC has implemented a view engine which allows us to use Razor inside of an MVC application to produce HTML. However, Razor does not have any ties with ASP.NET MVC.
Now, Razor Syntax is compact which minimizes the characters to be used, however it is also easy to learn.
Some of Razor Syntax Rules for C# are given below.
- It must be always enclosed in @{ ... }
- Semicolon “;” must be used to ending statements
- Files have .cshtml extension.
- Variables are declared with var keyword
- Inline expressions (variables and functions) start with @
- C# code is case sensitive
It starts with code block and its condition is written in parenthesis. And the code which needs to be executed once condition gets satisfied is written inside braces.
Let’s understand with the below example.
- @{var price=60;}
- <html>
- <body>
- @if (price>50)
- {
- <p>The price is greater than 50.</p>
- }
- </body>
- </html>
In the above example, we have declared var price has a value of 60 and we are using if statement which is validating price. If the price is greater than 50 then the code written in side braces gets executed.
If – Else statementIt starts with code block and its condition is written in parenthesis. And code which needs to be executed once the condition gets satisfied is written inside braces and if it does not gets satisfied then code written inside else block gets executed.
Let’s understand with the below example.
- @{var price=60;}
- <html>
- <body>
- @if (price>50)
- {
- <p>The price is greater than 50.</p>
- }
- else
- {
- <p>The price is less than 50.</p>
- }
- </body>
- </html>
Razor View Engine vs. Web Form Engine
System.Web.Razor.System.Web.Mvc.WebFormViewEngine. @Html.ActionLink("SignUp", "SignUp") <%: Html.ActionLink("SignUp", "SignUp") %> System.Web.UI.Page class which makes the testing complex.Razor Syntax and Razor Statements, Loops etc.
Routes & URLs
There are two types of routing for action methods:
Conventional Routing
When we create a new ASP.NET Core MVC application using the default template, the application configures a default routing. Let’s create a new project and examine this.
After creating a new project with the default ASP.NET Core MVC template, let’s have a look at the startup.cs class. We can see that the application has configured a default routing in the Configure() method:
Inside the call to UseEndpoints(), we use the MapControllerRoute() method to create a route by giving the name default
Attribute Routing
By placing a route on the controller or the action method, we can make use of the Attribute Routing feature.
Now let’s modify the BooksController by giving custom attributes as routes:
[Route("Route/Details/{id:int}")]
public ViewResult Details(int Id)
{
}
We have specified the URL paths /, /Home, or /Home/Index for the BooksController.Index() action and /Home/Details/{id} for the Details() method. When using Attribute Routing, the controller name and action method name plays no role in selecting which action method to execute.
We can also use Http[Verb] attributes for Attribute Routing:
For the URL path /books, MVC will execute the ListBooks() action when the HTTP verb is GET and CreateBook() when the HTTP verb is POST.
Route attributes defined on the controller are combined with route attributes on the individual action methods to form the complete URL. Any route templates defined on the controller are prepended to route templates on all of its action methods. When we place a route attribute on the controller, all actions in the controller use attribute routing.
Multiple Routes
Attribute routing supports defining multiple routes that reach the same action. The most common usage of this is to achieve the functionality of the default conventional route:
By defining two routes, the Index() method matches the URL paths /Books and Books/Index.
Helpers
Understanding Html Helpers
What is HTML Helper in ASP.NET MVC 5?
- HTML Helpers are methods that return a string.
- Helper class can create HTML controls programmatically. HTML Helpers are used in View to render HTML content.
- It is not mandatory to use HTML Helper classes for building an ASP.NET MVC application.
- Tag Helpers,
What are Tag Helpers in ASP.NET Core?
Tag Helpers in ASP.NET Core are the server-side components. They are basically used to perform defined transformations on HTML Elements. As they are server-side components, so they are going to be processed on the server to create and render HTML elements in the Razor files.
If you are coming from ASP.NET MVC background, then you may be worked with the HTML helpers. The Tag Helpers are similar to the HTML helpers.
Types of Tag Helpers in ASP.NET Core:
There are two types of Tag helpers in ASP.NET Core. They are as follows:
- Built-In Tag Helpers: They come in-built in the ASP.NET Core Framework and can perform common tasks like generating links, creating forms, loading assets, showing validation messages, etc.
- Custom Tag Helper: That can be created by us to perform our desired transformation on an HTML element.
How to use built-in Tag Helpers in ASP.NET Core MVC?
In order to make the built-in tag helpers available for all the views of our application, import the tag helpers using the _ViewImports.cshtml file. You need to import them using the @addTagHelper directive as shown below.
@addTagHelper *, Microsoft.AspNetCore.Mvc.TagHelpers
Understanding the Anchor Tag Helper in ASP.NET Core:
The Anchor Tag Helper in ASP.NET Core creates the standard HTML anchor (<a … ></a>) tag by adding new attributes such as:
- asp-controller: It is used to specify the controller to target based on the routing system. If you omitted this, then the controller of the current view is used by default.
- asp-action: It is used to specify the Action method to target based on the routing system. If you omitted this attribute then the action rendering the current view is used by default.
- asp-route-{value}: It is used for specifying the additional segment value for the URL. For example, asp-route-id is used to provide value for the ‘id’ segment.
The rendered anchor element’s “href” attribute value is determined by the values of these “asp-“ attributes. As the name says, asp-controller specifies the name of the controller whereas asp-action specifies the name of the action name. Similarly, the asp-route-{value} attribute is used to include route data in the generated href attribute value. {value} can be replaced with route parameters such as id, name, etc.
Let us have a look at the following image.

- Custom Helpers
- URL helpers Server-side Data Receiving Ways
Action Parameters
View Models/Objects
FormCollection
https://dotnettutorials.net/lesson/formcollection-mvc/
What is the FormCollection Class in ASP.NET MVC?
The FormCollection class in ASP.NET MVC will automatically receive the posted form values in the controller action method in the form of key/value pairs. The values can be accessed using either key names or indexes. We can use the FormCollection to loop through each key and its value that is posted to the server. Let’s add the following Create Post method in the employee Controller class.
Reusable UI Components
Creating ViewModel
Understanding ASP.NET Core MVC Validation
C:\Users\vasan\OneDrive\Desktop\Online Class\MVC Class Projects\ValidationDataAnnotation
The model is the M in MVC. The data model represents the core business data/information that an application is being used to access and manipulate. The model is the center of any application. The model encapsulates the storage and validation concerns. HTML helpers are provided by ASP.NET MVC to do the input validations. Additionally, we can also use data annotation attributes from the namespace to do validations at the model level. Data annotation attributes are attached to the properties of the model class and enforce some validation criteria. They are capable of performing validation on the server side as well as on the client side
Some frequently used tags are,
- Required
- Regular Expression
- Range
- EmailAddress
- DisplayName
- DataType
- StringLength
- UIHint
- DataType
- StringLength
- MaxLength
- MinLength
Need of Server Side and Client Side Validation
Validation with Data Annotation
Custom Server and Client side validation
client - data annotation
DataAnnotations is used to configure your model classes, which will highlight the most commonly needed configurations. DataAnnotations are also understood by a number of .NET applications, such as ASP.NET MVC, which allows these applications to leverage the same annotations for client-side validations
Server side - Inside action method (ex. checking text box value ,etc)
Data Passing Techniques
ViewData, ViewBag and TempData
Session
Query String
Cookies
LINQ Fundamentals
Understanding LINQ
Advantages of LINQ
Query Based Syntax and Method Based Syntax Deferred Execution vs. Immediate Execution
SQL Joins with LINQ
Lazy Loading vs. Eager Loading
LINQPad
Understanding and Configuring LINQPad LINQPad Querying SQL Server database LINQPad Querying DAL layer DLL using
Introduction to Entity Framework Core ORMs used with .NET
EF6 vs. EF Core
Advantages of Entity Framework
Database Migration, DB Procedures and Functions Entity Framework Code First Migrations
Updating Database when the Model Changes
Calling Stored Procedures and functions
Code First with existing Database
Repository Design Pattern and Unit of Work Design Patterns Understanding Repository and UOW Design Pattern Need of Repository Design Pattern
Need to Unit of Work Design Pattern
Implementing Repository and UOF Design Pattern Dependency Injection
Understanding Dependency Injection
Need of Dependency Injection
Implementing DI
ASP.NET Core MVC Authentication: Identity ASP.NET Core MVC Authentication Options Introduction to Identity
Implementing Identity
ASP.NET Core MVC Pipeline, Middleware and Filters Exploring ASP.NET Core Pipeline
ASP.NET Core MVC Middleware
ASP.NET Core MVC Filters
Extending ASP.NET Core MVC Filters
Configuring ASP.NET Core MVC Filters
Securing ASP.NET Core MVC App
Implementing Authorization using Authorization Filter Passing Logged in User Info Across the App

Comments
Post a Comment