CSS Class 1
CSS is used to control the style of a web document in a simple and easy way.
CSS is the acronym for "Cascading Style Sheet". This tutorial covers both the versions CSS1,CSS2 and CSS3, and gives a complete understanding of CSS, starting from its basics to advanced concepts.
Why to Learn CSS?
Cascading Style Sheets, fondly referred to as CSS, is a simple design language intended to simplify the process of making web pages presentable.
CSS is a MUST for students and working professionals to become a great Software Engineer specially when they are working in Web Development Domain. I will list down some of the key advantages of learning CSS:
Create Stunning Web site - CSS handles the look and feel part of a web page. Using CSS, you can control the color of the text, the style of fonts, the spacing between paragraphs, how columns are sized and laid out, what background images or colors are used, layout designs,variations in display for different devices and screen sizes as well as a variety of other effects.
Become a web designer - If you want to start a carrer as a professional web designer, HTML and CSS designing is a must skill.
Control web - CSS is easy to learn and understand but it provides powerful control over the presentation of an HTML document. Most commonly, CSS is combined with the markup languages HTML or XHTML.
Learn other languages - Once you understands the basic of HTML and CSS then other related technologies like javascript, php, or angular are become easier to understand.
Hello World using CSS.
Just to give you a little excitement about CSS, I'm going to give you a small conventional CSS Hello World program, You can try it using Demo link.
<!DOCTYPE html>
<html>
   <head>
      <title>This is document title</title>
      <style>
      h1 {
         color: #36CFFF;
      }
      </style>
   </head>
   <body>
      <h1>Hello World!</h1>
   </body>
</html>
Applications of CSS
As mentioned before, CSS is one of the most widely used style language over the web. I'm going to list few of them here:
CSS saves time - You can write CSS once and then reuse same sheet in multiple HTML pages. You can define a style for each HTML element and apply it to as many Web pages as you want.
Pages load faster - If you are using CSS, you do not need to write HTML tag attributes every time. Just write one CSS rule of a tag and apply it to all the occurrences of that tag. So less code means faster download times.
Easy maintenance - To make a global change, simply change the style, and all elements in all the web pages will be updated automatically.
Superior styles to HTML - CSS has a much wider array of attributes than HTML, so you can give a far better look to your HTML page in comparison to HTML attributes.
Multiple Device Compatibility - Style sheets allow content to be optimized for more than one type of device. By using the same HTML document, different versions of a website can be presented for handheld devices such as PDAs and cell phones or for printing.
Global web standards - Now HTML attributes are being deprecated and it is being recommended to use CSS. So its a good idea to start using CSS in all the HTML pages to make them compatible to future browsers.
A CSS comprises of style rules that are interpreted by the browser and then applied to the corresponding elements in your document. A style rule is made of three parts −
Selector − A selector is an HTML tag at which a style will be applied. This could be any tag like <h1> or <table> etc.
Property − A property is a type of attribute of HTML tag. Put simply, all the HTML attributes are converted into CSS properties. They could be color, border etc.
Value − Values are assigned to properties. For example, color property can have value either red or #F1F1F1 etc.
You can put CSS Style Rule Syntax as follows −
selector { property: value }
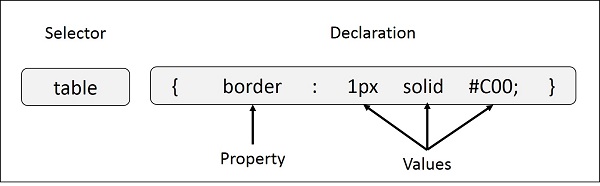
Example − You can define a table border as follows −
table{ border :1px solid #C00; }
Here table is a selector and border is a property and given value 1px solid #C00 is the value of that property.
You can define selectors in various simple ways based on your comfort. Let me put these selectors one by one.
The Type Selectors
This is the same selector we have seen above. Again, one more example to give a color to all level 1 headings −
h1 {
   color: #36CFFF;
}
The Universal Selectors
Rather than selecting elements of a specific type, the universal selector quite simply matches the name of any element type −
* {
   color: #000000;
}
This rule renders the content of every element in our document in black.
The Descendant Selectors
Suppose you want to apply a style rule to a particular element only when it lies inside a particular element. As given in the following example, style rule will apply to <em> element only when it lies inside <ul> tag.
ul em {
   color: #000000;
}
The Class Selectors
You can define style rules based on the class attribute of the elements. All the elements having that class will be formatted according to the defined rule.
.black {
   color: #000000;
}
This rule renders the content in black for every element with class attribute set to black in our document. You can make it a bit more particular. For example −
h1.black {
   color: #000000;
}
This rule renders the content in black for only <h1> elements with class attribute set to black.
You can apply more than one class selectors to given element. Consider the following example −
<p class = "center bold">
   This para will be styled by the classes center and bold.
</p>
The ID Selectors
You can define style rules based on the id attribute of the elements. All the elements having that id will be formatted according to the defined rule.
#black {
   color: #000000;
}
This rule renders the content in black for every element with id attribute set to black in our document. You can make it a bit more particular. For example −
h1#black {
   color: #000000;
}
This rule renders the content in black for only <h1> elements with id attribute set to black.
The true power of id selectors is when they are used as the foundation for descendant selectors, For example −
#black h2 {
   color: #000000;
}
In this example all level 2 headings will be displayed in black color when those headings will lie with in tags having id attribute set to black.
The Child Selectors
You have seen the descendant selectors. There is one more type of selector, which is very similar to descendants but have different functionality. Consider the following example −
body > p {
   color: #000000;
}
This rule will render all the paragraphs in black if they are direct child of <body> element. Other paragraphs put inside other elements like <div> or <td> would not have any effect of this rule.
The Attribute Selectors
You can also apply styles to HTML elements with particular attributes. The style rule below will match all the input elements having a type attribute with a value of text −
input[type = "text"] {
   color: #000000;
}
The advantage to this method is that the <input type = "submit" /> element is unaffected, and the color applied only to the desired text fields.
There are following rules applied to attribute selector.
p[lang] − Selects all paragraph elements with a lang attribute.
p[lang="fr"] − Selects all paragraph elements whose lang attribute has a value of exactly "fr".
p[lang~="fr"] − Selects all paragraph elements whose lang attribute contains the word "fr".
p[lang|="en"] − Selects all paragraph elements whose lang attribute contains values that are exactly "en", or begin with "en-".
Multiple Style Rules
You may need to define multiple style rules for a single element. You can define these rules to combine multiple properties and corresponding values into a single block as defined in the following example −
h1 {
   color: #36C;
   font-weight: normal;
   letter-spacing: .4em;
   margin-bottom: 1em;
   text-transform: lowercase;
}
Here all the property and value pairs are separated by a semicolon (;). You can keep them in a single line or multiple lines. For better readability, we keep them in separate lines.
For a while, don't bother about the properties mentioned in the above block. These properties will be explained in the coming chapters and you can find complete detail about properties in CSS References
Grouping Selectors
You can apply a style to many selectors if you like. Just separate the selectors with a comma, as given in the following example −
h1, h2, h3 {
   color: #36C;
   font-weight: normal;
   letter-spacing: .4em;
   margin-bottom: 1em;
   text-transform: lowercase;
}
This define style rule will be applicable to h1, h2 and h3 element as well. The order of the list is irrelevant. All the elements in the selector will have the corresponding declarations applied to them.
You can combine the various id selectors together as shown below −
#content, #footer, #supplement {
   position: absolute;
   left: 510px;
   width: 200px;
}
Embedded CSS - The <style> Element
You can put your CSS rules into an HTML document using the <style> element. This tag is placed inside the <head>...</head> tags. Rules defined using this syntax will be applied to all the elements available in the document. Here is the generic syntax −
Live Demo<!DOCTYPE html> <html> <head> <style type = "text/css" media = "all"> body { background-color: linen; } h1 { color: maroon; margin-left: 40px; } </style> </head> <body> <h1>This is a heading</h1> <p>This is a paragraph.</p> </body> </html>
It will produce the following result −
This is a heading
This is a paragraph.
Attributes
Attributes associated with <style> elements are −
| Attribute | Value | Description |
|---|---|---|
| type | text/css | Specifies the style sheet language as a content-type (MIME type). This is required attribute. |
| media | screen tty tv projection handheld braille aural all | Specifies the device the document will be displayed on. Default value is all. This is an optional attribute. |
Inline CSS - The style Attribute
You can use style attribute of any HTML element to define style rules. These rules will be applied to that element only. Here is the generic syntax −
<element style = "...style rules....">
Attributes
| Attribute | Value | Description |
|---|---|---|
| style | style rules | The value of style attribute is a combination of style declarations separated by semicolon (;). |
Example
Following is the example of inline CSS based on the above syntax −
Live Demo<html> <head> </head> <body> <h1 style = "color:#36C;"> This is inline CSS </h1> </body> </html>
It will produce the following result −
This is inline CSS
External CSS - The <link> Element
The <link> element can be used to include an external stylesheet file in your HTML document.
An external style sheet is a separate text file with .css extension. You define all the Style rules within this text file and then you can include this file in any HTML document using <link> element.
Here is the generic syntax of including external CSS file −
<head>
   <link type = "text/css" href = "..." media = "..." />
</head>


Comments
Post a Comment